Wednesday, December 18, 2013

Christmas Time

... is herrreeee

Oh, how I love the Holidays.  As much as people like to say it's too commercialized (thanks, Pope Francis), kids these days get waaaayyy too much stuff, and now, Black Friday is not so much Friday anymore... and no, I'm not technically Christian.  Commercialized or not, there is something special about the season that makes me happy. I still love my red Starbucks cups, having either Love Actually or The Holiday on repeat on my bluray player, and gift wrapping. 

Yes, I love gift wrapping.  AND, it's a special talent of mine.

Give me some of that red fermented grape juice in fancy stemware on a Thursday evening, and I'll go to town.  If it's snowing outside, that juice might be replaced with some spiked hot chocolate.  Bailey and I get along great when it's cold :)

I typically browse through Pinterest and get some rough ideas on how I want to go about wrapping every holiday season.  This year, I went with a neutral theme.

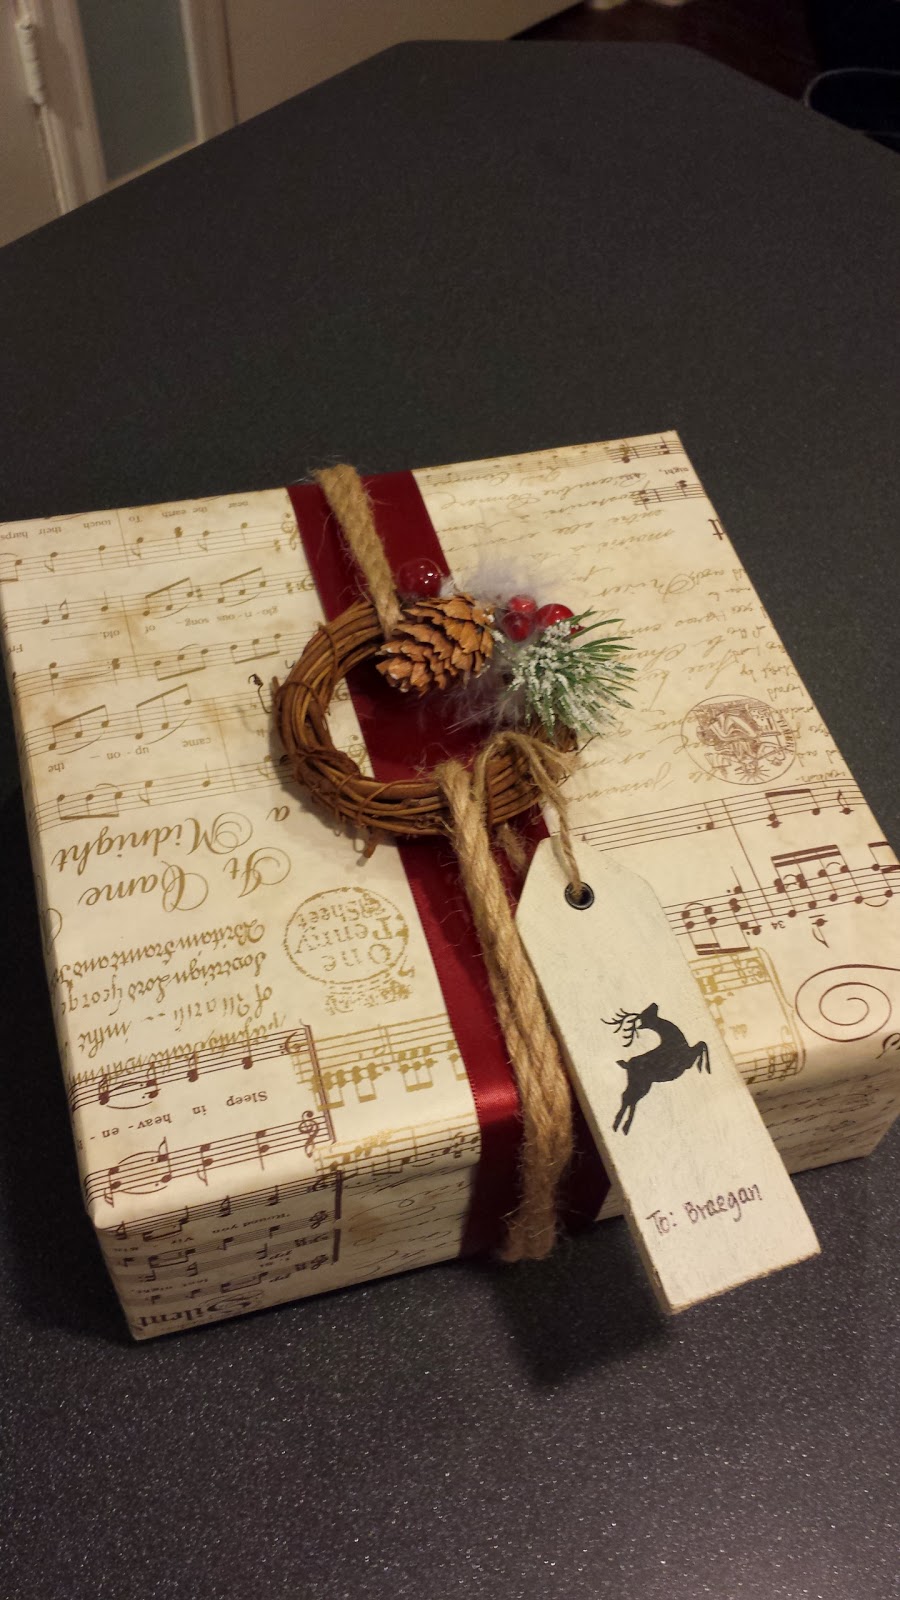
Found this AMAZING wrapping paper at HomeGoods for $2.99 a roll.  Christmas Music scores.  I also found this pin here.  Mini-wreaths instead of bows! Brilliant!


So with my handy dandy hot glue gun, I made wreaths out of $.59 wreaths from JoAnn and bought this for $5.99 and disassembled the berries and pine cones to put on my wreaths.

Here's the turnout!


and a Christmas BONUS.... my ugly Chrstimas sweater that I handmade, and won at my office's Ugly Sweater Contest :)

Barbie & Elf are trimming the tree (me).  Barbie also has an ugly sweater on! LOL


I hope everyone has a Happy and Safe Holidays! See you in 2014 :)

Wednesday, July 3, 2013

The Kitchen - Final Reveal!!

Of course, the final reveal is the most exciting part of any project or renovation... oh, the sigh of relief, the feeling of accomplishment, the feel of sweat equity really paying off... and of course, the thought that you'll get to enjoy the newly renovated room from here on out until... well, until you either sell the house or the room your just renovated is considered outdated again.

So... here we go!  Pictures speak for a thousand words, as they say :)  Enjoy!


It's a definite change from the days of the old kitchen:


Tuesday, May 28, 2013

Kitchen Renovations - The Pre-Finale

So I've been periodically jumping around with projects!!

Let's get back to my kitchen.  The kitchen is where the heart of the home is.  If your kitchen is done right, even if the rest of the house looks like crap, sometimes you can sell the whole house because your kitchen is amazing.  I wanted not only a good looking kitchen, but a functional one.

Again, here's the before blueprint:

And the after:
So, here we go.  The last part, I left off with the load bearing wall coming down, and header beam going in.  After the beam went in, things moved along at a good speed.  It shows how amazing things look different when you do things to walls, whether it's just painting it or putting decor on it, or in this case, covering up the studs...

The 1/2 bath is framed in....
Another view of the 1/2 bath


Mudding!

My general contractor gave me the sweats when we went through 5 layers of linoleum and vinyl and when he saw the original hardwood did the breathing in through his teeth (and he's NOT smiling), and the deep exhale with his mouth in the shape when kids blow out their birthday candles.  Then he says softly, "We might not be able to save it". 

"BUT MARK!! IT'S NOT IN MY BUDGET!!"

"Well, I know Miyu, but this looks prettttty bad.  I'll have the flooring subs make the call."

1 day later.  Enter Flooring Experts.  I gulp.  2 seconds.

"Oh, psh, this will clean up just fine! We are just so happy you're saving them.  A lot of people don't even bother asking and they'll just tear it straight out because of how it looks.  Can we take before and afters to put on our website?  It's good education.  Old floors are almost always salvageable.  That's the beauty of hardwood."

Then, we fixed the floors.  We had a lot of patching to do because of where old walls used to be, where cabinets used to be, etc.  They called it "lacing".  I call it MAGIC.  Refinishing cost me $1500.  If I had gotten new flooring, it'd been over $3000.  CHA-CHING.


No joke, the floor with all the dust and grime on it is the original hardwood.

Then, the cabinets came.  I chose to paint the cabinets (althought I'm a big fan of dark stained cabinets!) because of 2 reasons.
1)  I didn't want the hardwood floors to clash with my cabinets
2)  My kitchen really lacks natural lighting.  The 2 windows that exist faces West and Southwest.  So I needed to brighten my kitchen up some other way.

Poplar is a very good wood to use, if you're painting.


 Is it dinner time yet?  It's getting a little cozy in this kitchen!

Stay tuned for the final reveal!!

Wednesday, May 8, 2013

First Time Pinterest Challenge!

So, Young House Love is one of my favorite blogs to read everyday.

And... this is my first time at participating in their Pinterest Challenge!


And whaddya know, the Pinterest inspiration also comes from YHL, here is the original post.  Isn't it a beauty? It's made of marble tile (oooooh) in a herring bone pattern (aaaah)!

So here we go:

This was part of my basement renovation, I saw the Pin online when I was debating how I should tackle the mantle of the fireplace.

First, let's look at this fireplace (before) from afar:


Closeup:


Then, I started to reface it:


I directly applied the mortar to the brick (instead of using cement board) for a few reasons:

1.  Brick was straight, no loose brick (I fixed some top ones that were loose)
2.  Brick was bare, any sealer had worn off of it over time (I mean... my house is 85 years old, after all)
3.  I lightly sanded the brick with 60 grit sandpaper so that the mortar would have something to cling onto.

Some key points here with stacked stone tile are:

1.  Keep it level.  Stone will not stack correctly if you don't keep it level!
2.  Lay the tile out first, on the floor or something.   This way, you can arrange the tile how you want it since the color of the tile are all different. The last thing you want is uneven colors... evenly distribute the darker tiles and lighter tiles.
3.  This may sound obvious, but start at bottom and move up.  The stone sits on top of each other.  The stone is too heavy for the mortar to be its support.

The #3 above is hence why I have an odd-looking, jerry-rigged wood support system for tile in the middle:


Then, I needed a mantle.  It was an odd size (57" long) so I said, maybe a 60" shelf will work?  So I started looking... but couldn't really find anything I liked.

This is when the YHL blog post on their fireplace reface really REALLY helped me out!  YHL made their own mantle out of MDF and I took what they did at the top with the 2x8, crown molding.

I got the materials:

1 - 6 ft 2x8 piece of board
2 - 6ft 1x2 stain grade trim pieces
1 - 6ft crown molding
1 - 6ft 1x4

Then I built this:


After two coats of paint, I liquid nailed it on top of the mantle for the finished beauty:


What Pinterest Challenge will you take on this Spring?  A spring wreath?  A summer pasta salad made from scratch?  Basement fireplaces...???


Friday, March 29, 2013

Kitchen Renovation Part II

It's been a little while since my last post: Kit Kit Kitchen.

So, last place I left off was that my kitchen was gutted, I found some amazing wallpaper, and I was going to be taking out a loadbearing wall (eeeek!!) and combining 3 spaces, the breakfast nook, the original kitchen, and the CatPalace Pantry to create one huge kitchen.

I'm not going to lie.  I had never intended on blogging my renovation process so I don't have tutorials... but I do have some good pointers about kitchen expansions.

  1. CREATE AN EAT-IN SPACE.  My house was built in the 1930's, but the developers at the time were ahead of their time: an ensuite bathroom (more on that in a later post!) with the Master Bedroom, another full bathroom, and a powder room on the main level.  Just because your house is old doesn't mean you can't have an eat-in kitchen!  A breakfast bar can create a space that makes it easy for entertaining and a great space for a quick bite.
  2. ALWAYS FOLLOW THE 3-STEP RULE.  There is a reason why this rule exists.  A good looking kitchen doesn't mean a functional kitchen.  Make sure your sink, your prep area, your cooktop or stove, and refrigerator are all within 3-steps away from each other.    
  3. MAKE YOUR KITCHEN PERSONAL.  I'm a wine geek, so I knew I wanted a space where I can display my stemware and my wine bottles.  I also like collecting cookbooks, so I had a little bookshelf built in a section where I can store them.  If you have pets, think about where you want to put their bowls!  One may think, "Why make it personal if I want to raise resale value of the kitchen?"  Truth is, I think wine racks and bookshelves are just great additions that adds value and not deter buyers away.  If anything, the kitchen will be a huge selling point.  With the right buyer, that extra amenity you put in the kitchen may be the token to a quicker sale.
  4. CONSIDER WOOD FLOORS INSTEAD OF TILE.  I think the best decision I made for the kitchen was to keep the original hardwood floors.  To me, tile is just so cold and so hard... refinishing the hardwood floors not only saved me $$$ but it also gave the kitchen a very classic look.  My inspiration:
So here we go with some more BEFORE pictures:

 The floor of the kitchen was vinyl... on top of vinyl... on top of vinyl... on top of linoelium, then another layer of lenolium, then finally, after 5 layers, we discovered the original hardwoods.  The most confusing thing for me was the fact that one of the vinyl floors mimicked wood.  WTF?


 So, the journey begins with demolition which you can read more about here

After many wallpapers and pounds of plaster torn down, we were finally down to the studs:

The wall that was eliminated!
Load bearing wall came out, and new header was placed in:


Look at that beauty!

 More to come!
Wanna read the first part?  Here it is

Monday, October 22, 2012

The Kit Kit Kitchen

As you remember, my mood board looked like this:


So... here it goes, a drawing I did so cheaply (FOR FREE!) in Lowe's Virtual Designer.  3D modeling technology at its best! BOOM!


Don't mind the overhang piece of countertop... that's me not knowing how to use the software.
This made me wiggle.  I wanted a little wine rack area with glass cabinets to see all the stemware... and a nice peninsula so people can sit, a super heavyduty overhead hood so that I can cook all the Asian food I want and not stink up the house, and a little nook for the cookbooks I own.

Now, how the hell am I going to get this?  Yep, well, you have to knock down a few walls and rooms to achieve this, including the Cat Palace (Thank god that we get to get rid of this area).

How did we do it?

SLEDGEHAMMER IT! (and, well carefully also sustaining the structural integrity of the house)


Nasty nasty PLASTER
  Oh and I found this LOVELY wall paper in the Cat Palace.

LOVE IT